What Is a Bus and a Stem in Music Production? Audio Routing 101
What is a bus in music production vs. a stem? Here's the exact difference, when to use each, and how proper routing speeds up your workflow.

What is a bus in music production and what are stems — these two terms describe completely different things, but they get mixed up constantly. Here's the short version: a bus is an internal routing pathway you use during your mix to group and process tracks together. A stem is an exported audio file — a rendered group of tracks you hand off for mastering, live performance, or collaboration. One lives inside your session. The other lives on your hard drive. By the end of this, both will be completely clear.
What Is a Bus in Music Production?
A bus (sometimes called an aux or a subgroup) is a signal routing channel that collects audio from multiple tracks and sends them to a single destination for shared processing. It exists only inside your DAW — nothing gets exported, nothing gets saved to a new file. It's a live, internal pathway.
The city bus analogy works perfectly here: individual tracks are passengers getting on at different stops. The bus picks them all up and takes them to the same destination — usually the master fader, or another processing stage. Every passenger shares the same ride, which means any processing on the bus applies to all of them equally.
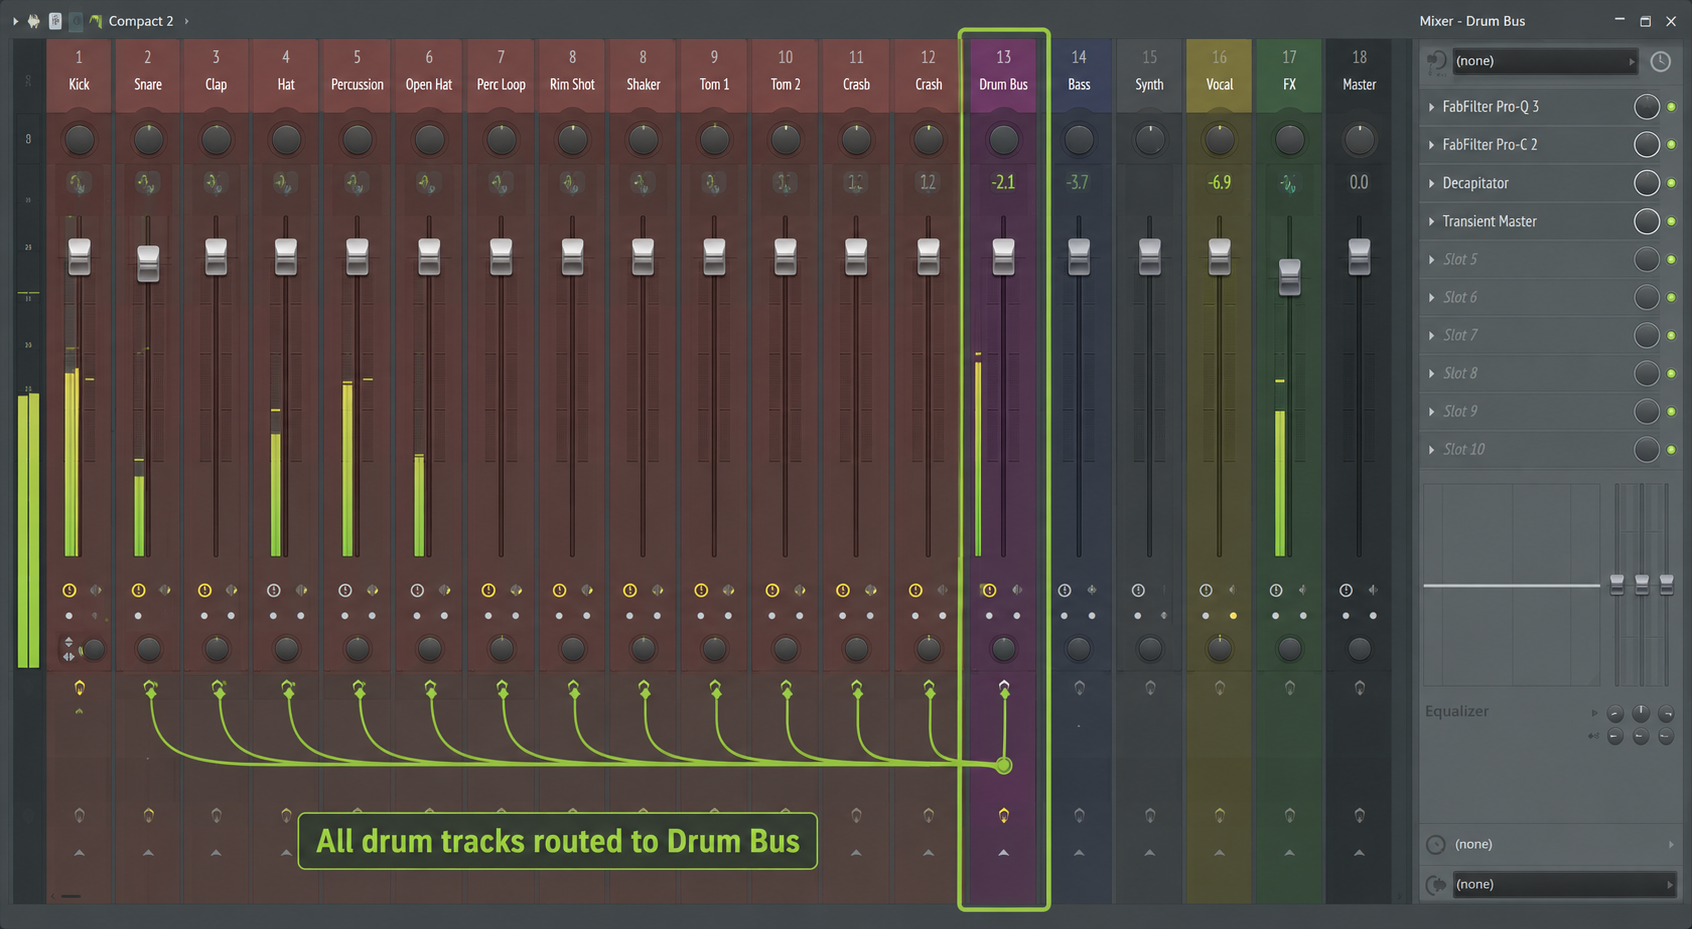
The Drum Bus
This is the most common bus setup in any session. You take your kick, snare, hi-hats, and toms — each on their own track — and route them all to a single Drum Bus channel.
Now you put a glue compressor on that bus. One plugin, compressing all your drums together as a unit. The kick and snare start to feel like they belong in the same room. That's the power of bus processing: it creates cohesion you can't get by compressing each element in isolation.
In Ableton Live, this is a Return track or a Group track. In FL Studio, it's a Mixer insert routed as a send. In Logic Pro, it's a Bus channel in the Mixer. In Pro Tools, it's an Aux Input. Different names, identical concept.
The Vocal Bus
Same principle applied to vocals. Lead vocal, doubles, ad-libs, and background harmonies each have their own track and their own individual processing. But they all route to a Vocal Bus where you apply a shared EQ and a touch of reverb to glue the vocal stack together before it hits the master.
This way, if you want to turn the entire vocal stack up or down, you move one fader — not eight.
The Aux Bus (Shared Effects)
An Aux Bus is a specific type of bus used for shared time-based effects — reverb and delay, mostly. Instead of putting a reverb plugin on every track (which kills your CPU), you create one Aux bus with one reverb instance. Individual tracks send a portion of their signal to that bus, get the effect applied, and the wet return blends back into the mix.
One reverb plugin serving 20 tracks. That's efficient routing.
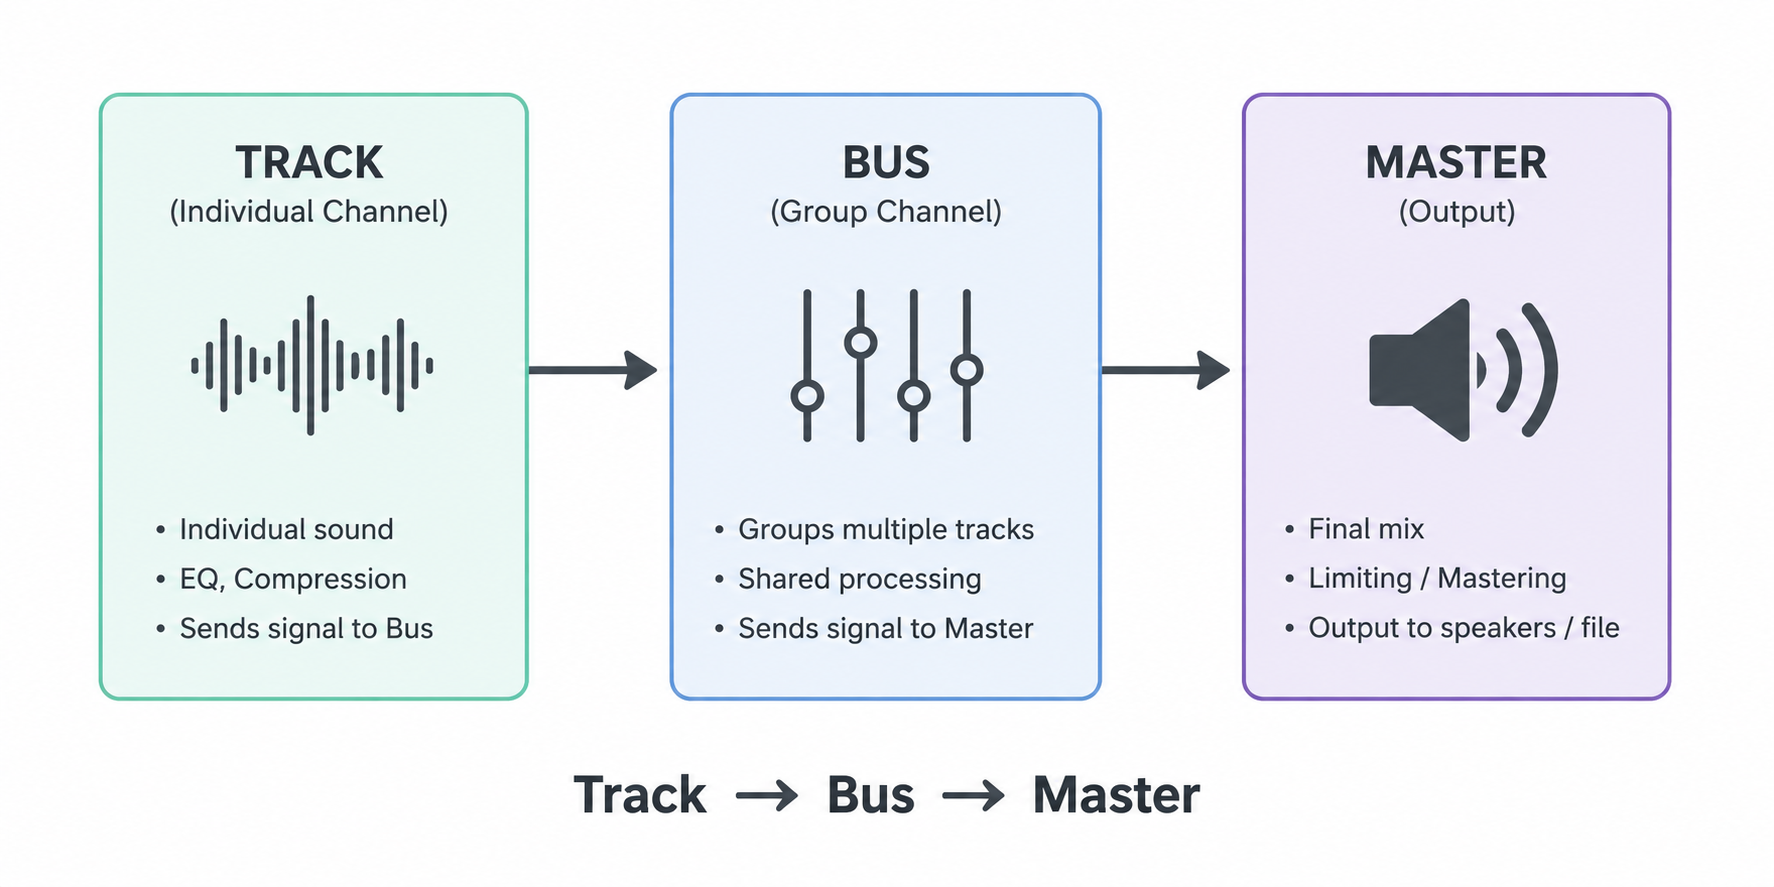
Signal Flow: Track → Bus → Master
Here's how audio moves through a typical bussed session, step by step:
- Individual track (e.g., Snare) generates audio signal
- That signal passes through the track's own channel strip — EQ, compression, any individual plugins
- The track's output is routed to the Drum Bus instead of directly to the master
- The Drum Bus applies shared processing (glue compression, bus EQ, saturation)
- The Drum Bus output routes to the Master Fader, along with all other buses
- The Master Fader receives the full mix and sends it to your audio interface or export
Every bus in your session follows this same path. Parallel buses (for parallel compression) fork that signal before it hits the master, but the principle is identical.
What Are Stems in Music Production?
Stems are exported, rendered audio files that each contain a combined group of tracks from your session. Where a bus is a live internal pathway, a stem is the result of bouncing that pathway down to a stereo file.
A stem is not the same as a raw multitrack. A multitrack is every individual track exported separately — kick on one file, snare on another, each vocal take its own file. A stem is a rendered group: all your drums mixed together into one stereo file, all your synths into another. Less granular than multitracks, more granular than a full mix.
When Do You Need to Export Stems?
Sending to a mastering engineer. If your mastering engineer offers stem mastering (highly recommended over full-mix mastering for anything serious), they'll ask for stems — typically 4 to 8 files covering your major element groups. They process each group independently, which gives them far more control than a single stereo mix.
Working across DAWs. You produce in FL Studio and your collaborator mixes in Pro Tools. You can't just send the project file — they can't open it. You export stems and they import clean, processed audio files into their session. No plugin compatibility issues, no missing samples.
Live performance. When performing live without a full band, stems are your backing track. You might perform over a Drum Stem and a Bass Stem while playing keys live on top, keeping the energy of the original production without needing a full band onstage.
Remixing and licensing. When you license a track or deliver for sync, the receiving party often requests stems so they can re-edit, re-mix, or isolate elements for different media formats. If you're planning to go that route, read licensing basics for producers first — knowing what you're delivering and why matters before the stems leave your drive.
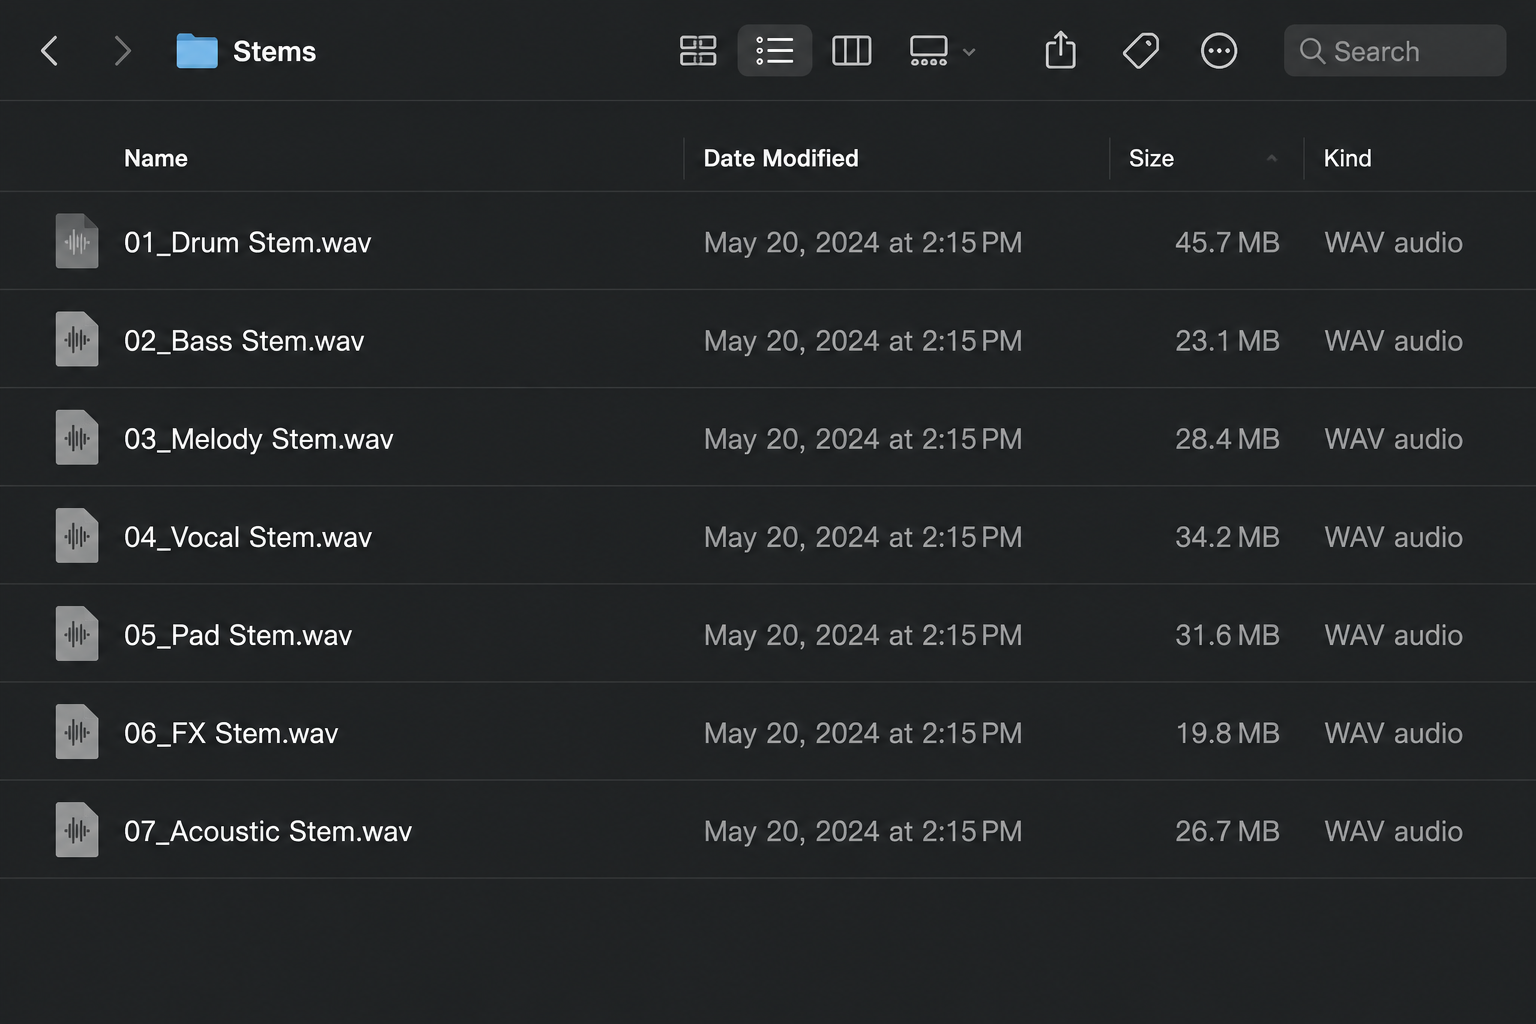
A Typical Stem Delivery Package
A standard stem export for a produced record might look like this:
- Drum Stem — kick, snare, hats, percussion, all drum bus processing printed in
- Bass Stem — bass guitar or 808, sub elements
- Harmonic Stem — chords, pads, keys, guitars
- Lead Synth / Top Line Stem — melodic leads, arps, featured synth parts
- Lead Vocal Stem — lead vocal with its final processing chain
- BGV Stem — doubles, harmonies, ad-libs
- FX Stem — risers, downlifters, atmospheres, transitions
Each file is stereo, rendered at the session's sample rate (typically 48kHz/24-bit), with the full processing chain printed in — including any bus processing those tracks ran through.
Busses vs. Stems: The Ultimate Comparison
For most producers, a bus is your daily tool and stems are your delivery format. You build buses on every session; you export stems only when the project is leaving your hands.
| Feature / Aspect | Audio Bus | Audio Stem |
|---|---|---|
| What it is | Internal signal routing channel | Exported stereo audio file |
| When you use it | During the mix, in real time | Post-mix, at delivery or handoff |
| Produces a new file? | No — exists only inside the DAW | Yes — a rendered .wav or .aiff file |
| Main purpose | Group processing, shared effects, mix control | Mastering, collaboration, live performance, archiving |
| Lives where? | Inside your session | On your hard drive / shared with others |
| Example | Drum Bus with glue compression | Drum Stem exported as a 48kHz/24-bit stereo file |
| Editable after creation? | Yes — fully dynamic and adjustable | No — you'd need to re-export from the session |
How Proper Audio Routing Speeds Up Your Workflow
Setting up clean buses from session start isn't just good practice — it directly changes how fast you move through a mix and how much creative headroom you have.
Tip 1: Build Your Bus Template Before You Start
Don't build buses reactively when your session gets messy. Set up a session template in your DAW with your standard buses already in place — Drums, Bass, Synths, Vocals, FX. Every new project loads with clean routing from bar one.
In Ableton, save this as a default Live Set. In Logic, save it as a template project. In FL Studio, save it as a default template in the Mixer. Fifteen minutes of setup now saves you an hour of routing headaches on every future session — and it's one of the fastest ways to finish more songs.
Tip 2: Use Buses to Protect Your CPU
Every shared reverb or delay you run on an Aux Bus instead of individual tracks is CPU you're saving. On a session with 40+ tracks, that adds up fast.
The rule: if more than two tracks are using the same reverb sound, it should be on an Aux Bus — not duplicated across tracks. Native Instruments and Waves plugins aren't light. Run them smart.
Tip 3: Mix in Sections, Not Individual Tracks
Once your buses are set up, start your mix by getting each bus group sounding right as a unit before touching individual track faders. Get the Drum Bus sitting right in the mix. Then the Bass Bus. Then Synths. Then Vocals.
This approach — called subgroup mixing — prevents the classic trap of obsessing over one snare track for an hour while the full mix sounds wrong. You hear groups in context first, then fine-tune details. It's faster, and your decisions stay musical.
Frequently Asked Questions
What is a bus in music production? A bus in music production is an internal signal routing channel that collects audio from multiple tracks and sends them to a shared destination for group processing. It doesn't create a new file — it's a live pathway inside your DAW. Common examples include a Drum Bus, Vocal Bus, or Aux Bus for shared reverb.
What are stems in music production? Stems in music production are exported stereo audio files, each containing a rendered group of tracks from a session — such as a Drum Stem, Bass Stem, or Vocal Stem. Stems are used for mastering, DAW-agnostic collaboration, live performance, and licensing. They differ from raw multitracks, which export every individual track separately.
What is the difference between a bus and a stem? A bus is an internal routing channel used during mixing — it processes audio in real time but produces no file. A stem is an exported, rendered audio file created after mixing. Think of it this way: your Drum Bus processes your drums during the session; exporting that bus to a stereo file gives you a Drum Stem.
Do I need to export stems for mastering? Not always — but stem mastering gives a mastering engineer significantly more control than a single stereo mix. If you're working with a professional mastering engineer on anything serious, ask if they offer stem mastering. Most will, and the results are consistently better than full-mix mastering alone.
What is an aux bus vs. a regular bus? Both are routing channels, but the term "Aux Bus" typically refers specifically to a bus used for shared effects processing — usually reverb or delay — where tracks send a portion of their signal rather than routing their full output. A standard bus (or subgroup) receives the full output of multiple tracks for group processing like compression or EQ.
The Bottom Line
A bus is a live routing pathway inside your session — use it to group tracks, apply shared processing, and control your mix efficiently. A stem is an exported audio file — use it when the project leaves your hands for mastering, collaboration, or performance. Get your bus template built once, and stem exports become a clean, repeatable process every time. The producers who understand signal flow at this level mix faster, collaborate cleaner, and deliver better work.
More on this in the Craft section. And if you're building out your full studio setup, the best AI tools for music production pair well with a clean routing foundation.
Related: best AI music composition tools 2026 — the tools shaping how producers build sessions today.

Snax
Moroccan producer from Morocco. Credits include Dj Hamida, Leck, Small X, and Abduh — plus advertising campaigns for Spotify, BYD and more. At Beatonomy, he writes about the craft and business behind independent production.
The producer's edge, weekly.
No gear hype. No fluff. Strategy, systems, and the business of making music — delivered every week.